ABOUT
FEEDSCONTACT
EMAIL DIGESTCANDY RATINGSTYPE
BRAND
COUNTRY
ARCHIVES
|
PhotographyFriday, June 6, 2008
Candy Blog Photography
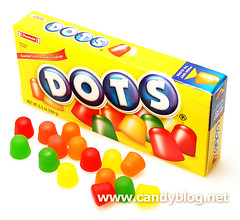
Now that you’ve seen my current photo studio, I thought I’d back up a bit and show you how I used to take photos before 2006, because you really don’t need all that if you’re on a budget and especially if you’re not doing the volume I do. WHAT I SHOOT WITH My camera is the Sony DSC-V3. I bought it used on eBay for $375 in March 2006 and it included a 1 gb memory card (which I actually fill up in one photo session from time to time but more importantly it’s fantastic for my whale watching). WHERE TO SHOOT I had two spots I liked to take photos:
I didn’t have a tripod, I’d just place the camera on a book or notebook (angled if I needed it), set the shot up and then turned on the timer (this left both hands free for holding the cardstock for bouncing the light).
The light was much better up there, most the time I’d set up a piece of white posterboard, sticking one side to a cardboard box and letting it slope down onto the surface of the table. This was under a white patio umbrella, which provided a nice diffuse light and of course I’d use the other pieces of posterboard for bounce. On these occasions I used a tripod, which gave me much more control and crisper shots.
While some folks call my old methods a little ghetto, I still take photos like that from time to time. Just some white office paper to grab a quick snap and when I’m traveling, sometimes I pick up some posterboard so I can take some product shots on the road. The other option, of course is to get some studio lights. The photo of my studio looks kind of jumbled, and believe me, it’s pretty much chaos all the time. SETTING UP THE SHOT While the photos may show the candy isolated in the middle of nothingness, believe me, there’s lots nearby.
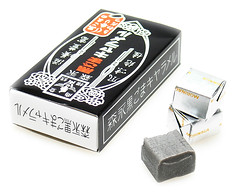
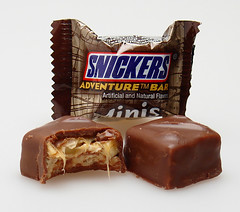
Silver reflective packaging is a bugger to shoot, everything has to be masked around it or else it shows up as a reflection. I have a piece of white posterboard with a little hole the size of my lens for just such occasions. The bonus is that it also bounces a good deal of light, so it gives a crisper, more even exposure. The trick here is to light the background and foreground at the same level. This will give the best base for the high key white. I also keep the objects quite close to the edge of the table, about 1/3 of the distance to the curve of the back (you can see that I didn’t do that in earlier shots, that’s part of what creates that shadowy background). A tripod is essential to product photos. It’s the best way to get clear and sharp photos, especially for longer exposures. Tripods are not expensive, so even if you can’t afford a shooting table like this, get a tripod.
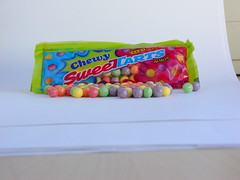
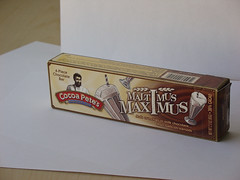
I work from the outside to the inside. It’s common sense, but something I’ve messed up on before. I shoot the outside of the package (sometimes right after I buy it and don’t complete the rest of the process until I schedule the review), then open it, shoot the item with the wrapper, sometimes solo ... then and only then do I break it open or take a bite. Sometimes, if I have a bounty of individual items, I’ll do several versions to get the best “bite with caramel pull” or “cross section of panned nut.” At the end of the session I usually have a dish of bitten candies. The shooting surface is a matte plexiglass. I wipe it down with 409 quite often, either because it’s gotten sticky or because I plan on eating whatever I place on there later. When I was shooting on posterboard I would often throw a piece of white office paper down when I knew I was going to have something gooey. POST PROCESSING THE SHOT
I always take pictures on the highest setting (the full 7.2 megabytes). Most of the time I use the plain old JPG setting, since these photos are for web. If I were doing something for print, I’d probably use TIFF or RAW - but then I’d run into storage issues. As it is I have about 60 gb of candy photos. If your camera has something called bracketing in the settings, I recommend giving it a try. It bumps the exposure up one level and down one level, taking three shots pretty much at the same time. This is a good way to see what levels would be best for a particular shot without moving the settings. For the most part I use the program mode (P) on my camera. I set the exposure bumped up to +1.7, even so, the background rarely turns out white. It’s gray.
If I’ve done everything right then all the photo needs is a little adjustment in the Photoshop Image > Adjustments > Curves menu. I push the upper white a little brighter and usually pull down the midtones a little darker. That’s it. BTW - you don’t even need the full Photoshop to do this. Photoshop Elements (which I got for free with my Wacom graphics tablet) works perfectly fine. Some other free image adjustment programs also do a great job - the best thing to do is take a great shot that needs only a few adjustments. But sometimes I’m sloppy and a few more adjustments are necessary. I might clone out some crumbs and sometimes the corners are a little darker for very large field shots so I’ll whiten them with the eraser or paintbrush.
Then things might need a little additional help, maybe a little burning/dodging for glared spots or things that are too dark in the shadows and lose their detail. Cross-sections might need a bit of dodging to enhance the difference between the caramel & nougat or at least bring up the contrast in that small area.
RESIZING FOR THE WEB For the most part I’ve moved to Flickr to host my photos and share them there (for a while I had them both on my own server and on Flickr). Flickr automatically resizes the photos to three useable sizes: 100 pixels, 240 pixels and 500 pixels. Flickr has a limited but good photo editing service called Picnik that will allow you to do some of the above adjustments right there. Picasa also offers some excellent hosting & editing services. If you’re hosting your own photos it’s usually best to use your photo software to create the web version so that it will be sharp and small at the same time. Photoshop has a “save for web” feature that allows you to preview exactly what the photo will look like saved at various compression settings. DEVELOPING A STYLE The style of Candy Blog photos is supposed to be clinical. My original idea with my photography was for it to be a true representation of both the candy and the package. Because the blog was supposed to do what I wanted the internet to provide for me - a breakdown of what that candy actually is. (I couldn’t find a site that did that, so I made one.) I like the photos on a blank white background, no background stuff to interfere. It isolates the subject and it really helped me to focus on just the candy itself, if only for that brief session when I photographed it. Yes, many of them are quite tasty looking, but I’ve always done my best to show what the candy actually looks like. I’m not trying to sell you anything. (There first dozen or so posts on Candy Blog actually don’t have the candy featured. It wasn’t until a couple of weeks later that I realized that’s what people really wanted to know ... what’s inside that box.) I set up my shots to be eye level with the candy for the most part, like the candy is as big as you are. TIPS FOR SHOOTING GOOD PHOTOS TIPS TO MAKE YOUR PHOTOS EVEN BETTER
More reading: Related Candies
POSTED BY Cybele AT 8:42 am Behind the Scenes • Candy • Featured News • Photography • Wednesday, April 11, 2007
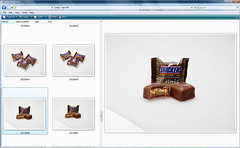
Browse the Candy Blog Photo ArchiveJim Bumgardner of KrazyDad put together this completely awesome mosaic of the candy review photos from Candy Blog.
It runs on Flash and shows itty bitty thumbnails of over 1,000 photos I’ve taken over the past two years. Roll over one of them, and a larger one will pop up for closer view (and drool). Then click on the photo and it’ll take you to the Flickr.com page with the photo (and hopefully there will be a link to the review back here if I’ve done my captioning correctly). You can view the photos in a boring static mode here. The mosaic will be updated periodically with new candy photos, so you’ll always be able to browse the archives in a way more befitting this eye candy. Note: you’ll have to disable any pop-up blockers on the CoverPop site. Don’t worry, there’s no ads there. Not only that, he’s got a discount coupon code at Old Time Candy if you hafta hafta order something when you’re done. Check out Jim’s other Coverpops while you’re there, too. POSTED BY Cybele AT 6:10 am Candy • Fun Stuff • Photography • Thursday, March 8, 2007
Spectacular Gummi ArtHere’s the ultimate in surrounding yourself with what you love. Gummi art. And not just any old jelly beans pasted to a canvas, these are dimensional (and sometimes functional) pieces made with gummi bears.
Created by YaYa Chou (click on Sculpture on the right to see the whole gallery of creations). There’s are a couple of three dimensional animals, a bear rug and the chandelier as well as a candelabra. I’d love to have the chandelier, supposedly you can still eat the bears ... I’m sure they’re great once the bulb has warmed them a little. Found via Tastespotting. POSTED BY Cybele AT 8:09 am Candy • Fun Stuff • Photography • Wednesday, February 7, 2007
Mercat la BoqueriaI spend a lot of time looking a photos of candy on Flickr. It’s a good way to stay in touch with what is enchanting other people. The thing that I’ve noticed lately is that people are often attracted to the same thing, over and over again. In general this would be like people taking photos of common landmarks (lots of photos of the Eiffel Tower that are tagged Paris, a lotta Golden Gate Bridge shots in San Francisco and “cute” has more cats than dogs or babies). One of the things that pops up with startling regularity in the Candy tag is a candy vendor at the Mercat la Boqueria in Barcelona, Spain. So I did a quick search and found more than a smattering of them (well here are 48 at least):
Has anyone ever shopped at this market or bought anything there? How much are those gummis? POSTED BY Cybele AT 9:41 am Candy • Spain • Fun Stuff • Photography • Thursday, December 28, 2006
Drop Dead Gorgeous PhotosIf you couldn’t already tell, I love taking photos of candy. And I love looking at photos of candy. This morning I saw a wonderful gallery of photos by Daniela Edburg called Drop Dead Gorgeous. They feature photos of death by various foodstuffs ... with candy playing a major role.
Check out the interview in The Morning News and of course a full gallery of the photos. If you’re in the Miami area you can see the photos in person at Kunsthaus, the exhibition is entitled Bittersweet. (Pictured above in the mosaic are snippets from Death by Nutella, Death by Gummi Bear, Death by Lifesavers and Death by Cotton Candy by Daniela Edburg.) POSTED BY Cybele AT 10:26 am Candy • Fun Stuff • Photography • Monday, April 24, 2006
Great Pumpkin!You know if I’m not eating candy or writing about candy, I’m out on the internet reading about candy and looking at candy photos. Last week I stumbled across two incredible sets of photos on Flickr, here’s a small sample:
Joshua has over 175 photos of individual pieces of Halloween candy, both wrapped and then unwrapped. I emailed him, and he gave me the story behind it. He collected a barrel of candy (50 gallons!) for Halloween as part of his work as a youth pastor. They did a huge challenge called the Pumpkin Hunt for middle and high school aged kids, kind of like a treasure hunt:
Wow, way harder than Trick-or-Treat, but it sounds a lot more fun. I wonder if the winner got the whole 50 gallons?
Monday, December 19, 2005
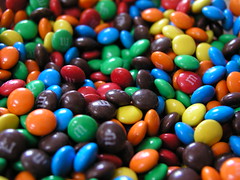
Food Art: M&MsMmmm, M&M balls. Though this one looks like it’s been rolling around for a while. Visit Nir Adar for more food porn by the excellent food photographer and artist. (Found via Slashfood.) Tuesday, December 6, 2005
Photos: Mini M&Ms
I love eating candy but I think one of the things that makes it so appealing is the look of it. There are a lot of great photographers out there taking awesome shots of candy. Of course one of the best things about candy is the continuity, I love a whole frame filled with the same thing, sweets! POSTED BY Cybele AT 9:33 am M&Ms • News • Photography • 
|
Meticulously photographed and documented reviews of candy from around the world. And the occasional other sweet adventures. Open your mouth, expand your mind.
SEARCHSearch the Candy Blog archives
    
FEATURED NEWS ITEMS
COPYRIGHT NOTICEAll content (text and photos unless otherwise credited) is copyright 2005-2026 by Cybele May Please do not use my photos without prior permission directly from me, they represent what I ate in preparation for these reviews and are not to be used for other purposes. Design by Hop Studios
|
|||