|
Sunday, April 6, 2008
Candy Blog Photo StudioI get emails and comments all the time asking how I do the photographs for Candy Blog. So I thought I’d show you my home studio (yes, I cleaned up for the photo).
My Equipment:
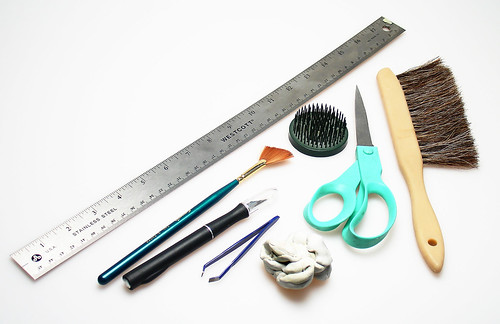
My Tools:
I store most of these underneath the table, which means that they’re always readily available.
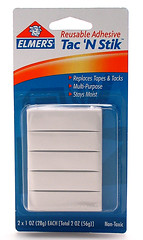
It’s completely moldable. I pull out little bits for propping up chocolate eggs or roll out a teensy string to put behind spherical candies like malted milk balls. I have a large wad of it on an old votive candle on both the base to keep it from slipping and on the face of it to stick the back of packages to, this gets them to sit up straight. It’s probably the best $2 you can invest in your tools. I also have a bunch of props and prop-em-ups sitting around. I have little glass vases, a selection of brandy snifters, wine glasses and ramekins. They don’t make it into the shots very often, but sometimes I like to play. I usually keep a few small dishes ready too. As I’m photographing, as you may have observed, I take a bite out of a lot of things. I usually just set the rest aside on a plate or put it back in the package to finish later. But there’s usually a dish of leftover items for my reviews that I munch on later that day or the next. Stay tuned for a tutorial on getting that white background look in photos. Related Candies
POSTED BY Cybele AT 11:43 am

|
||||
ABOUT
FEEDSCONTACT
EMAIL DIGESTCANDY RATINGSTYPE
BRAND
COUNTRY
ARCHIVES
|
Meticulously photographed and documented reviews of candy from around the world. And the occasional other sweet adventures. Open your mouth, expand your mind.
SEARCHSearch the Candy Blog archives
    
FEATURED NEWS ITEMS
COPYRIGHT NOTICEAll content (text and photos unless otherwise credited) is copyright 2005-2026 by Cybele May Please do not use my photos without prior permission directly from me, they represent what I ate in preparation for these reviews and are not to be used for other purposes. Design by Hop Studios
|
|||


-

Comment by
Amanda on 4/06/08 at 1:43 pm #
-

Comment by
rebecca on 4/06/08 at 3:25 pm #
-

Comment by
Bunny on 4/06/08 at 3:51 pm #
-

Comment by
brian on 4/06/08 at 4:41 pm #
-

Comment by
kat on 4/06/08 at 6:37 pm #
-

Comment by
R on 4/07/08 at 7:17 pm #
-

Comment by
Eva on 4/14/08 at 3:45 pm #
-

Comment by
Cybele on 4/21/08 at 12:41 pm #
-

Comment by
rachel on 5/15/08 at 5:17 am #
-

Comment by
Candy Lover on 6/24/08 at 11:24 am #
-

Comment by
BarkMan on 8/11/08 at 6:04 am #
-

Comment by
Brenda Chavez on 10/26/08 at 10:27 am #
-

Comment by
Anthony on 10/26/08 at 10:43 am #
-

Comment by
Cymon on 4/16/09 at 11:12 am #
-

Comment by
Shekar on 3/19/10 at 10:36 am #
-

Comment by
Cybele on 3/19/10 at 10:46 am #
-

Comment by
Tricia on 4/22/10 at 11:32 am #
-

Comment by
beading on 10/26/10 at 11:49 am #
-

Comment by
Cybele on 10/26/10 at 11:54 am #
-

Comment by
Dick Bolt on 7/27/11 at 7:48 am #
-

Comment by
Emily on 4/22/15 at 9:18 pm #
Commenting is not available in this channel entry.Thanks for sharing this with us! Your photos are always beautiful!
I love how much detail you put in to photographing the candy…I especially like it when you lay out each individual piece of candy in color order
Cool studio. Love it that there’s candy everywhere!
I noticed the light diffusing curtain on the window. Do you have any white balance issues shooting during the day? Thanks for sharing, your photos always look very well done.
love seeing how everyone creates their delicious photos! thanks for sharing.
wow! I will appreciate your photos even more now, knowing the level of care that goes into them.
Dear Cybele - Your photos are wonderful. It’s one of the best parts of the blog. Love, Mom
P.S. I think that old yellow sticky stuff was “Fun Tack”.
brian - the light from outside doesn’t make much difference once I turn on the light. I don’t often take photos during the day, anyway. That window faces northwest, so it gets mostly bounce light off the neighbor’s white stucco house.
Mom - thanks! I couldn’t remember what it was called.
R - I’ll try to put up some more about how to set things up and what to do after they’re shot.
How great! I love the fun tack tip.
I think it’s neat how you photograph the candy as if its a person. Plus the way you take pictures of the candy so you can see the inside is super cool.
I have used bent white paper in the past for the “seamless” look in photographs. The white plexiglass is a slick way to do it. Thank you for sharing.
how would you test which candy has the most food coloring hard candy or not hard candy?
I found that the Cracker Barrel Restaurant has the Sunkist Fruit Gems stocked regularly on their shelves.
Very nice job !
We are importers and distributors for confectionery and snack products based in Auckland.
Your website is great and very informative.
Your studio setup is our model now for taking pictures for our catalogue and your photography is fantastic!
Can’t find your tutorial on getting that white background. Have you not come around to it or am I missing it?
Thanks and regards,
Shekar
Shekar - sorry about that, I should have revised this post with a link.
Here it is: Candy Blog Photography.
Hello Cybele
I know you have your photos on Flickr.com but cannot find you there… help?
Thx
o my god your light setup is amazing and simple, i purchased a light box for my jewelry pictures and the damn light box cost me $400 :( may i ask what that white curved half box is? did you purchase that or make it?
your pictures are amazing, wish i had done the same :(
beading - you may ask what that lightbox is but I did actually say what it was in the post. You can google “Interfit Photo Table"t to find what the current price is and who sells it.
I am trying to get more info on Lifsaver history. Some time in late 30s or 1940s there was an add for Lifesavers put up in Grand Central Station in NY city. It was huge & was a Polaroid 3D (Stereo) ad called Vectograph. It was taken with a Graphic stereo camera by Charles DuBois Hodges (not a relative). A vectograph is made of slices of an image arranged so it follows you in Stereo as you pass by!I have a miniature (postcard size) of this ad. I would like to know dates or anything else about it? JPG available of Vectograph!
I didn’t know really where to post this but I just wanted to let you that I have fallen in love with your blog, this is coming from a weirdo introvert that HATES the internet. I have never found a blog that I call “Home” but ring the bell because I finally found it. I love how factual and how you explain candy, you’re like a wine aficionado, well except for sweets. I am truly a big nerd, specifically a history nerd and how you tell us when and where these candies came from and the break down is awesome, yet you don’t drone on and on, fact after fact. So thank you for getting me hooked, you’ll most likely be seeing me again
Next entry: Mint Crisp M&Ms (Indiana Jones)
Previous entry: Red Vines